Get Started with WorkCanvas: A Step-by-Step Guide to Unleashing Your Creativity
Are you ready to tap into your creative potential and build visually stunning, collaborative workspaces with your team? WorkCanvas, integrated with monday.com, is the ideal digital platform to help you do just that! Whether you're working solo or with a group, WorkCanvas provides a versatile online whiteboard that makes it easy to design retrospectives, create flowcharts, host workshops, and more.
This article will guide you through the essentials of getting started with WorkCanvas, offering tips on creating your first canvas, inviting team members, organizing your work, and presenting your creations.
This guide focuses on WorkCanvas, a distinct product from monday.com. While both share some similar concepts and terminology, their functionalities differ.
What is WorkCanvas?
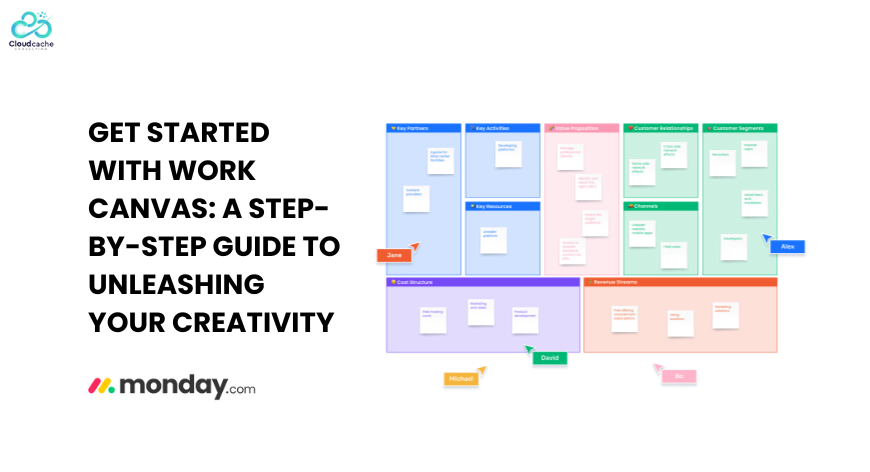
WorkCanvas is a cloud-based, intuitive digital whiteboard that enriches collaboration and creativity. Designed to suit a variety of needs, it allows you to visually express ideas, organize projects, and collaborate with others in real time. Whether you're mapping out a project, brainstorming ideas, or conducting remote workshops, WorkCanvas has the flexibility to meet your needs.
Step 1: Join WorkCanvas
To start your WorkCanvas journey:
- Open the official website.
- Click on the "Sign up" button.
- Enter the required details here for account creation.
Alternatively, access WorkCanvas from monday.com. Navigate to your "monday.com Products" section to find WorkCanvas.
Step 2: Navigating the WorkCanvas Home Page
The home page is your main hub in WorkCanvas. From here, admins can invite team members, create canvases, and navigate between different projects and teams. To invite new members, click the blue "Invite Members" button in the top right corner. Everyone added to the account will automatically have access to this home page, making it a perfect starting point for organizing your work.
On your home page, you'll see an overview of all your canvases, projects, and teams. This setup is designed to ensure easy access and management of all your collaborative work.
Step 3 : Create Your First Canvas
You can start working in WorkCanvas by either creating a new canvas from scratch or selecting one of the many available templates.
Start from Scratch
To create a new blank canvas, select the "New canvas" option from the "Create a new canvas" section. This opens a blank workspace where you can begin building your ideas. You can always import templates into a blank canvas if you need additional structure later.
Use a WorkCanvas Template
For a quicker start, WorkCanvas provides a variety of predesigned templates to suit different project needs. To access these templates, go to the "Template library" on the left-hand panel of your home page. From here, you can preview any template before selecting "Use Template" to begin working on it. This flexibility allows you to either customize an existing template or design from scratch, depending on the nature of your project.
Step 4: Adding Team Members to WorkCanvas
Collaboration is at the core of WorkCanvas. Adding new members to your account allows you to work together seamlessly, sharing ideas, updates, and tasks. To invite a member, click on the blue "Invite Members" button on your home page.
Once added, members can be assigned specific roles and teams, allowing for effective management of collaborative workspaces. For more details, check out the article on user management within WorkCanvas.
Step 5: Start Collaborating
WorkCanvas offers a wide range of tools to facilitate team collaboration. You can assign tasks to individual members, hold real-time collaboration sessions with built-in video chat, and leave comments on specific canvases to keep everyone aligned.
These tools make WorkCanvas an ideal platform for teams to work together on complex projects, ensuring clear communication and effective project management. For more details on collaborative features, read the article on team collaboration with WorkCanvas.
Step 6: Organizing Your Work with Projects
WorkCanvas helps you stay organized by allowing you to group your canvases into projects. A project in WorkCanvas is a collection of canvases stored in a folder, making it easy to find, manage, and share your work.
From the left-hand panel, create a new project; For this, click the "+" on "Projects". You can then name your project, invite teammates, and add existing canvases to begin collaborating on that project.
You can also move canvases between different teams and projects from the home page by selecting the three-dot menu on the top right corner of a canvas and choosing the "Move canvas" option.
Note: Canvases can only be moved to projects you have access to. Once moved, all members of the project will gain access to that canvas.
Step 7: Managing Your Canvases
WorkCanvas provides a straightforward way to manage all your canvases. Under "My canvases" on your home page, you can access each canvas' options by clicking the three-dot menu. Here, you can choose to copy the canvas link, duplicate the canvas, or delete it entirely.
Note: Only the creator of a canvas can delete it.
Step 8: Present and Export Your WorkCanvas
When it's time to showcase your work, WorkCanvas makes it simple to present and export your projects.
Presentation Mode
If you want to display your work in a presentation, select the "Present" icon in the bottom left corner of your canvas. This will open your canvas in a slide format, allowing you to navigate between different frames during the presentation easily.
Export to PNG
You can also export your canvas as a PNG image. Specify image quality, choose the "Export" icon, and save it. Unlike presentation mode, which only displays items within frames, exporting to PNG will capture everything on your canvas.
Export to PDF
If your canvas contains a lot of text or detailed information, exporting it as a PDF may be the best option. The PDF export feature allows you to preserve the layout and structure of your canvas, making it easy to share or print. WorkCanvas even offers additional options for encryption, annotations, and digital signatures when exporting to PDF.
Tip: You can choose to export specific frames as individual PDF pages or export the entire canvas onto a single page.
Conclusion:
WorkCanvas is a powerful tool that helps teams and individuals bring their ideas to life through collaborative, visual workspaces. With features that make it easy to create, manage, and share canvases, this platform is perfect for brainstorming, planning, and project execution. By following the steps outlined in this guide, you’ll be ready to unlock your creative potential and start collaborating effectively with your team.
Remember, whether you’re hosting a workshop, mapping a project, or presenting your work, WorkCanvas has the tools to help you succeed.
CloudCache Consulting provides monday.com consulting services. Contact us to know more.


Leave a Reply
Your email address will not be published.